

As we all know, our world is facing huge challenges to fight with the novel coronavirus. The whole world is currently in a shut down state and all the students are studying full time from home. Studying full time from home with 100% motivation and 0% procrastination is a challenging job. So this time I tried something new, I committed myself publicly to a campaign 100DaysofCode. For next 100 days, I have to code for at least one hour and update my progress publicly. I started this challenge with learning Android development and on 7th day I build a novel coronavirus application using Android library “Volley”.
So, without any further delays, lets get started by first creating a new project in Android Studio.
Create the project
Go to File ⇒ New Project. When it prompts you to select the default activity, select Empty Activity and proceed.
Add the dependency
Before starting with the coding part, we need to add the volley dependency in our gradle file.
implementation 'com.android.volley:volley:1.1.0'
Also, don’t forget to add the internet permission in manifest(Androidmanifest.xml)
<uses-permission android:name="android.permission.INTERNET"/>
Creating Text Views
Now, create Text Views in activity_main.xml to display the Headings and to display the the figures fetched from API.
<TextView
        android:layout_width="wrap_content"
        android:layout_height="wrap_content"
        android:textSize="30dp"
        android:layout_gravity="center"
        android:text="Total Confirmed"
        android:padding="10dp"
        android:fontFamily="serif"
        app:layout_constraintBottom_toBottomOf="parent"
        app:layout_constraintLeft_toLeftOf="parent"
        app:layout_constraintRight_toRightOf="parent"
        app:layout_constraintTop_toTopOf="parent" />
<TextView
        android:textColor="@color/sgreen"
        android:id="@+id/totalconfirmed"
        android:layout_width="wrap_content"
        android:layout_height="wrap_content"
        android:textSize="30dp"
        android:layout_gravity="center"
        android:padding="10dp"
        android:fontFamily="sans-serif-black"
        app:layout_constraintBottom_toBottomOf="parent"
        app:layout_constraintLeft_toLeftOf="parent"
        app:layout_constraintRight_toRightOf="parent"
        app:layout_constraintTop_toTopOf="parent" />
Don’t forget to change add the android:paddingTop=”10dp”, android:paddingBottom=”10dp”
Creating Requests and adding it to RequestQueue
So there are two main classes Request and RequestQueue.
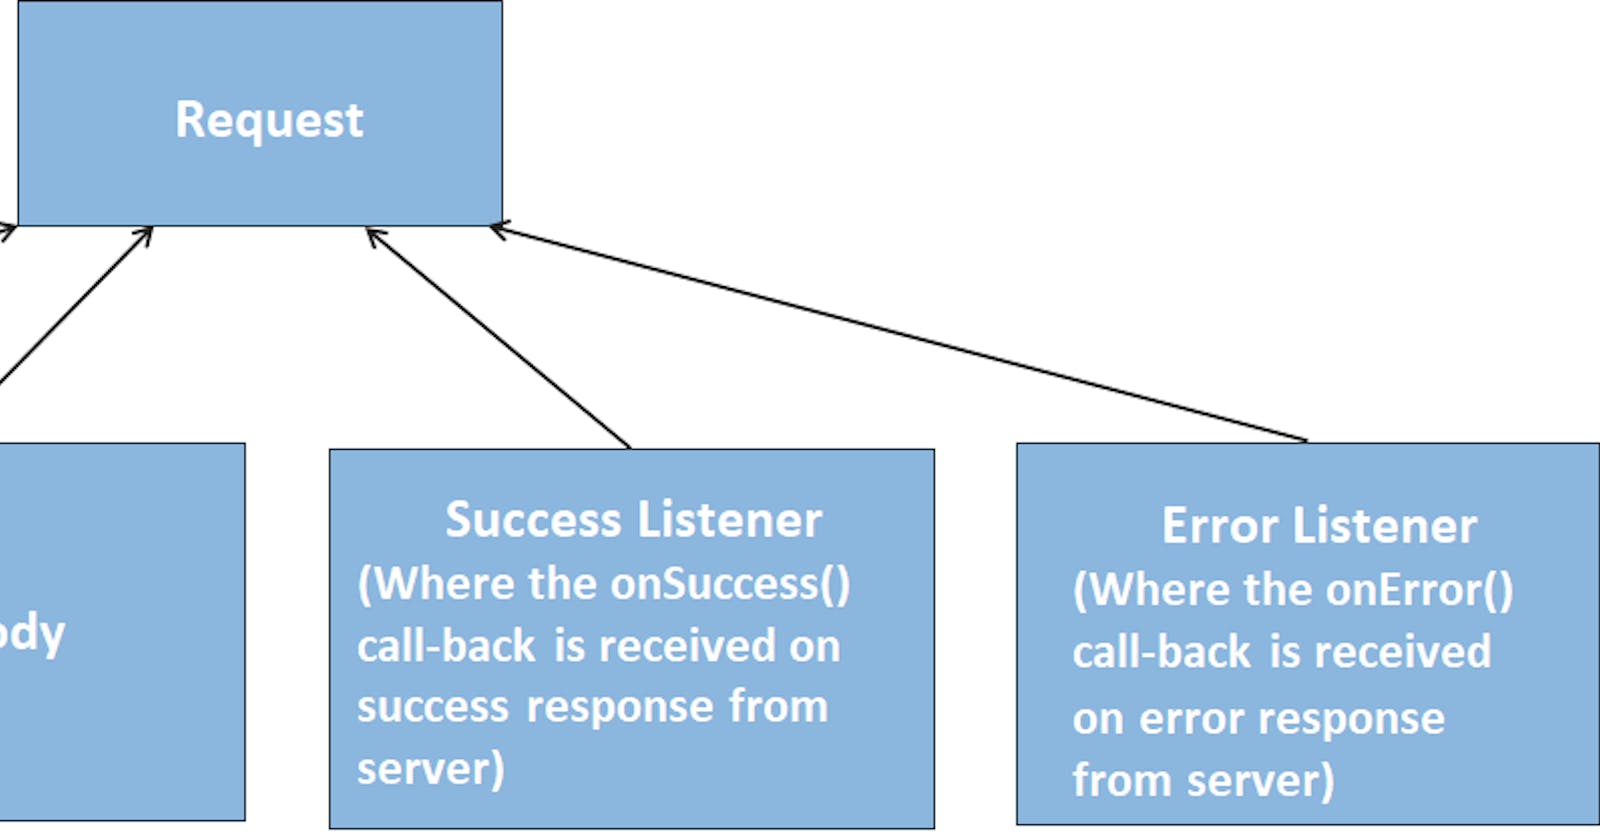
- Request class demands for few parameters based on the type of request the app is calling. Let me take an example of JsonObjectRequest
 JSON Object Request
The major parameters for forming a JsonObjectRequest are:
a) URL
b) JSONBody: required if any JSON object needs to be sent
c) SuccessListener: The interface where we receive onSuccess() callback when proper response is obtained
d) ErrorListener: The interface which gives us the onError() callback when there exists an error [Server error/ Network error etc.,]
Code snippet
public void sendjsonrequest(){
        JsonObjectRequest JsonObjectRequest=new JsonObjectRequest(Request.Method.GET, url, null, new Response.Listener<JSONObject>() {
            [@Override](http://twitter.com/Override)
            public void onResponse(JSONObject response) {
                try {
                    totalconfirmed1=response.getString("cases");
                    totalactive1=response.getString("active");
                    totalcritical1=response.getString("critical");
                    totaldeaths1=response.getString("deaths");
                    totalrecovered1=response.getString("recovered");

public void sendjsonrequest(){
        JsonObjectRequest JsonObjectRequest=new JsonObjectRequest(Request.Method.GET, url, null, new Response.Listener<JSONObject>() {
            @Override
            public void onResponse(JSONObject response) {
                try {
                    totalconfirmed1=response.getString("cases");
                    totalactive1=response.getString("active");
                    totalcritical1=response.getString("critical");
                    totaldeaths1=response.getString("deaths");
                    totalrecovered1=response.getString("recovered");

totalconfirmed.setText(totalconfirmed1);
                    totalactive.setText(totalactive1);
                    totalrecovered.setText(totalrecovered1);
                    totalcrtitical.setText(totalcritical1);
                    totaldeaths.setText(totaldeaths1);

Toast toast1=Toast. makeText(getApplicationContext(),"Data Fetch Success",Toast. LENGTH_SHORT);
                    toast1.show();

} catch (JSONException e) {
                    Toast toast1=Toast. makeText(getApplicationContext(),"JsonError.dev",Toast. LENGTH_SHORT);
                    toast1.show();
                    e.printStackTrace();
                }
            }
        },new Response.ErrorListener() {
            @Override
            public void onErrorResponse(VolleyError error) {
                Toast toast1=Toast. makeText(getApplicationContext(),"Unable to fetch the data,Restart the application",Toast. LENGTH_LONG);
                toast1.show();
                Toast toast11=Toast. makeText(getApplicationContext(),"Slow Internet Connection detected,Restart the application",Toast. LENGTH_LONG);
                toast11.show();
            }
        });
        mQueue.add(JsonObjectRequest);
    }
Complete Source Code: https://github.com/randandrambles/Coronavirus-Realtime-Tracker
And that’s it. Thank you for sticking with me till the end of this tutorial. I hope this was helpful in some way to you.
Till next time :) Happy Learning.
If you liked this article make sure to 👏 it below, and follow me on