


All you need is a VM and some basic knowledge of Linux.

Anyone who captures your IP address can access what you’ve been searching on the internet and where you were located. A virtual private network famously known as VPN helps you to be completely anonymous on the internet, gives you online privacy by creating a private network from a public internet connection.
You might think Why do you need a VPN when there are already thousands of VPN service providers offering free and premium services on one click. But, these providers are only here to make some quick money and don’t give any security to your data so you can’t trust them.
In this article, I’ll guide you step by step on how to setup your own Linux Virtual Machine and how to deploy the openvpn servers in minutes. I will be using Microsoft Azure for setting up the virtual machine, you can use any other cloud service provider like Digital Ocean or Linode(the process remains the same).
Step 01: Setting up Virtual Machine in Azure
Type virtual machines in the search and under services select Virtual machines.
In the Virtual machines page, select Add.
In the Basics tab, under Project details, make sure the correct subscription is selected and then choose to Create new resource group.

Type virtual machine name and select the region of your choice(I chose UK SOUTH).
Select Ubuntu Server 18.04 in Images
Select the Size of your virtual machine. You can select Standard B1ls which is cheapest with estimated price of $5/month(depending on the region).
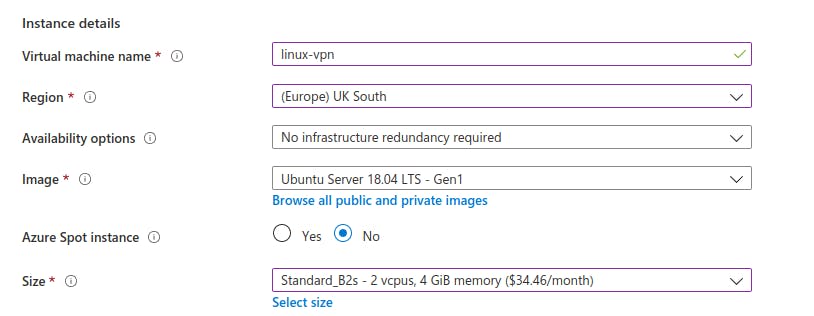
Change the Authentication type from SSH public key to Password and type the Username, Password, Confirm Password credentials.
Change the Public Inbound Ports to Allow Selected Ports and Select Inbound ports to SSH(22).
You don’t need to configure anything else on this or any other page, click Review+Create.

Azure will validate the given information and it may take few minutes. After the validation pass, you’ll be redirected to Review+Create where you can recheck all of your information and click Create to continue the process.

Step 02: Configuring the Network Settings
- Once you complete setting up the virtual machine, head on to the Networking page from the left options bar.
Head on to Networking, select Add Inbound port rule.
Change the Destination port ranges to 1194
Change Protocol to UDP
Change Action to Allow
Change Name to UDP_PORT_1194.
Keep all the other settings as default, once you configure, click Add.


Step 03: Connect to Virtual machine
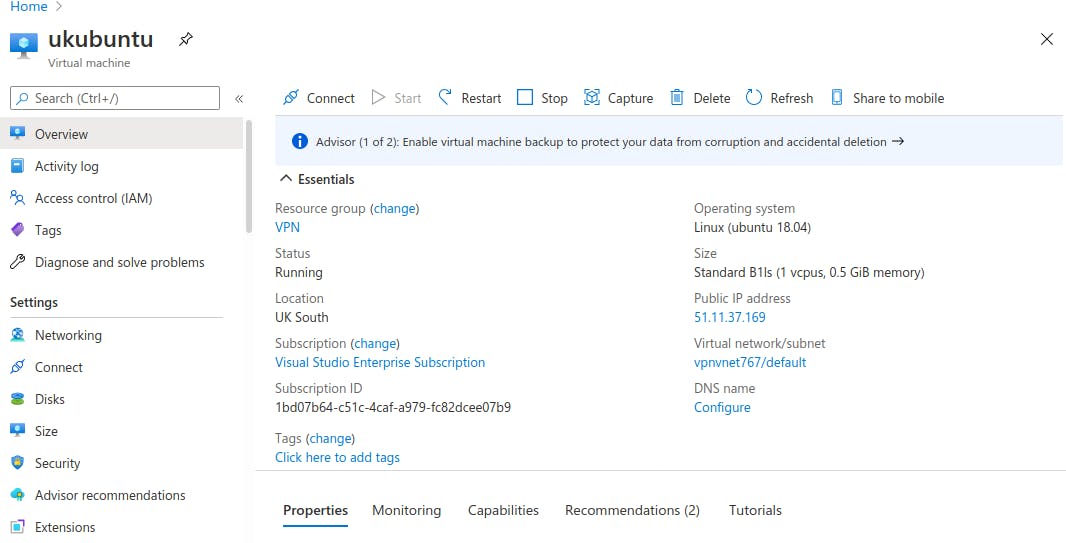
Click Overview and then SSH. You will be able to find your SSH connection details.
Open your terminal and type your credentials to login.
If you are using Windows to connect to virtual machine, I recommend you to use Putty, If you are using Linux, use your Terminal.


Step 04: Installing OpenVPN server.
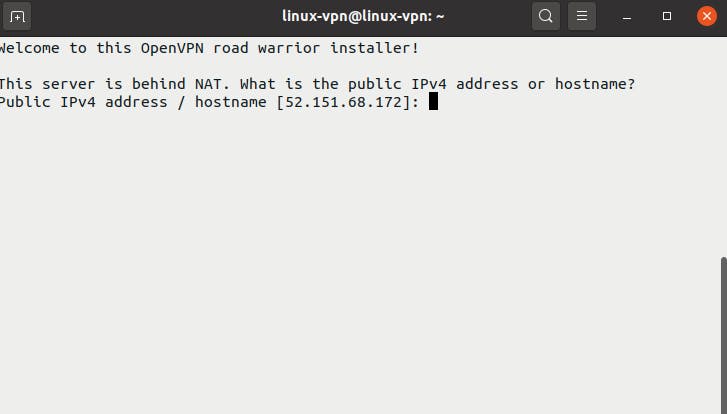
- Head on to https://github.com/nyr/openvpn-install

Run the script and follow the assistant.
In host name, type the recommended host name(which is 52.151.68.172 in my case)
For Protocol, select 1 as recommended.
For Port, type 1194, which we recently added in Azure Networking page.
For DNS server, you can select any of them but going with Current system resolvers is suggested.

For Client name, choose any name of your choice(I am going with vpnserver)
Press Enter to continue.

After few minutes, OPENVPN will be successfully installed and you will be able to see following screen with prompt “New client can be added by running this script again”

Congratulations, you successfully setup OPENVPN server on your Linux.
Step 05: Connecting to the VPN.
For connecting to the virtual private network in Windows, you will need to move your (.ovpn) file from server to your client’s computer.
Install and run the OPENVPN GUI on your Windows.
Import the (.ovpn) file to OPENVPN GUI.

- Connect to the VPN.

- Once the VPN is connected, you will be able to see this dialog, with OPENVPN GUI icon color changing to green.

Speed Test:
There is no doubt in that Virtual Private Network slows down the downloading speed, uploading speed and bandwidth of your connection. Here is the before and after results of the Download and Upload speed.

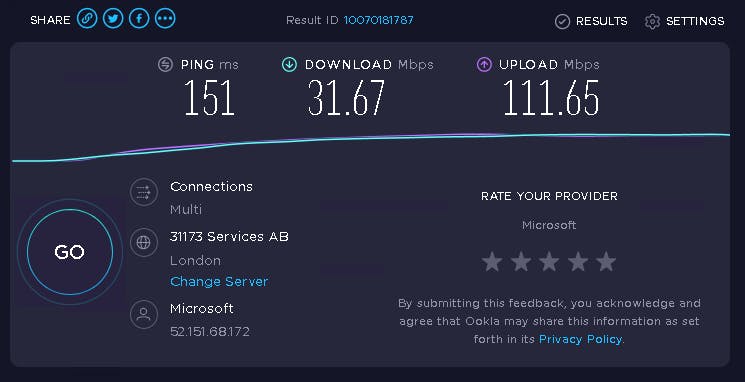 Speed test before and after the VPN connects.
And that’s it. Thank you for sticking with me till the end of this tutorial. I hope this was helpful in some way to you.
Till next time :) Happy Learning.
If you liked this article make sure to 👏 it, and follow me on **Twitter**